
The Basic Microcycle
Episode #2 of the course Hack your workout: A self-paced system for core muscle and posture strength by John Robin
Welcome to Day 2 of our course!
Yesterday, we discussed how the workout I’ll be teaching you is based on two new units of time that will allow you to flex it around your lifestyle:
• the microcycle
• the set
Today, we’re going to take a complete tour of the microcycle, which means seeing all the sets that make it up. This will form the foundation of the rest of our course, as we discuss each part in more detail.
Your Microcycle
The microcycle is the period of time it takes to complete the sets of exercises laid out on the microcycle sheet.
Here is a picture:
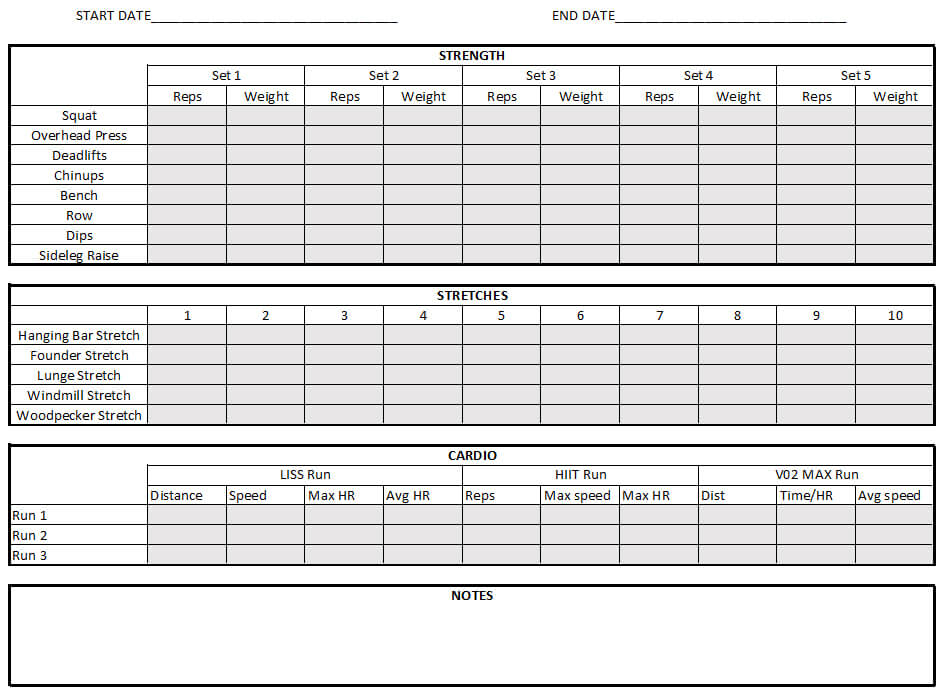
I’ve included this in an Excel file as a resource link at the end of the lesson so you can print it out and get started.
We will be going over all parts of this sheet throughout the course, so don’t worry right now if it looks overwhelming. Though I’ll explain how this workout can be customized, you’ll soon learn how each exercise has a purpose, so you’ll likely want to follow it closely when you learn how to do it.
The Components of the Microcycle Sheet
You can see in the above image that there are three components to the workout sheet. Each of these components has specific exercises, represented by the rows, with progress tracked in the columns.
Strength. The first eight rows are for the eight different types of strength exercises. These are carefully selected to develop all muscle systems that improve your core strength, which will help you improve your posture.
I’ll talk more about each exercise on Day 4: Strength 101.
You complete five sets for each exercise, represented by the main five columns. You’ll notice that for each set, it is broken into two sub-columns. The left one is for reps and the right one is for weight.
Let’s talk about what a set is, because it’s the fundamental unit that makes up your workout.
A set is made up of reps. Rep stands for repetition.
For example, imagine doing a pushup. One rep would be the action of lowering your body to the ground, then raising it back up to where you started.
One pushup = one rep.
A set consists of how many reps you do. In the pushup example, if you did 20 pushups, that would be 20 reps.
In your microcycle, for each exercise, you are tracking both the number of reps you do and the weight.
The weight column is for how much weight you add in each set.
In the pushup example, you would put “BW,” which stands for “body weight,” because for each rep, you’re just lifting your body weight. If you attached a 10-lb. weight to your waist while you did your pushups, you would put “10 lb.”
Weight will vary across the five sets you do, based on a strategy I’ll teach on the last day of our course.
Stretches. The next five rows in the microcycle sheet are for the five types of stretches you’ll do. Like with the strength exercises, each of the stretches is carefully selected to target your core muscles relating to posture. I’ll talk about this more on Day 5: Stretching 101.
Notice that there are ten main columns in this section. They aren’t divided into sub-columns as with the strength exercises.
This is because we don’t track weight in stretching. For a given stretch, you simply assume a specific posture, then hold it.
Each column, then, is one set for a given stretch.
Instead of reps, you will count how long you spend on each set. You do this by counting your breaths.
For example, if you’re stretching your arms out to the side and count ten breaths, then you’d put “10” in the column for the given set.
There’s a reason we use breath instead of a timer, which I’ll also talk about on Day 5.
Cardio. The final three rows are for the various kinds of cardio you will do. Cardio is short for cardiovascular exercise. You can think of it as many lighter reps adding up over a longer time.
I make the assumption that you will pick running, but you can replace running with cycling or swimming or the elliptical machine. The principles that I’ll teach you in Day 6: Cardio 101 apply to whatever form of cardio exercise you do.
The columns for the cardio section are a little more complicated. We will save those column details for our Cardio 101 day!
Getting Started on the Workout
We will spend the remainder of the course talking about how to do the workout like a pro, but before we get into any of that, we will deal with the next important problem of where and how to do it.
Stay tuned for tomorrow’s lesson on setting up your workout space, including the equipment you’ll need if you want to do it at home.
The microcycle sheet in Excel
Download a copy of the Excel microcycle sheet
Recommended resource
Though I don’t necessarily recommend their program, the StrongLifts 5×5 website has great reference material on the exercises in the microcycle sheet.
Share with friends