
Adding and Removing Data
Episode #5 of the course Intro to SQL by Mike Schmitt
We were able to view our data in the previous lessons, but how did those records get in the database in the first place? And what if we want to remove data? Let’s revisit our Users table from earlier lessons and simulate the lifecycle of a customer.
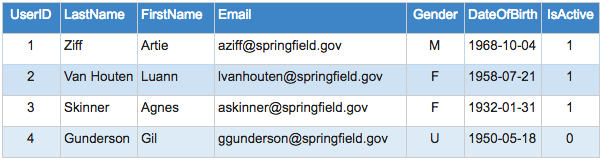
So a new customer comes along, loves the pants on your website, and decides to create an account to keep current on your offerings. Your site prompts for some basic personal information (hint: what is listed in our table above), which the user types in. The user clicks submit and triggers the following SQL to run:
INSERT INTO Users (Email, LastName, FirstName, Gender, DateOfBirth, IsActive)
VALUES ('milhouse@springfield.gov', 'Van Houten', 'Milhouse', 'M', '1979-04-01', 1);
What just happened? Let’s break down the syntax. The first part is INSERT INTO, which signals we will create a new record in our table, followed by a listing of our column headers. The column header listing signals which fields we will be passing information for. In this case, it is the columns Email, LastName, FirstName, Gender, DateOfBirth, and IsActive. The second part of the statement is simply the related information. This is signaled with VALUES followed by the column data that needs to be listed in the same order as the column specification following the INSERT INTO. For instance, the first data value is ‘milhouse@springfield.gov,’ which corresponds to our first listed column header of Email. Both the column headers and the data values need to be enclosed in parentheses.
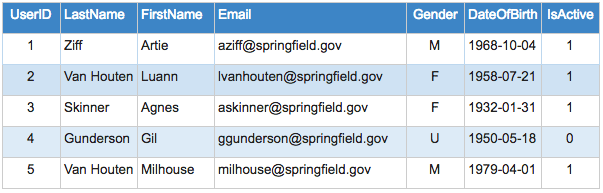
We can now view our new record:
Perhaps you want to use the same table for an insert statement but do not want to include data for every column. For instance, to exclude gender, the SQL statement would alter slightly in the fields indicated to be included in the record insert.
INSERT INTO Users (Email, LastName, FirstName, DateOfBirth, IsActive)
VALUES ('milhouse@springfield.gov', 'Van Houten', 'Milhouse', '1979-04-01', 1);
This will simply insert a null value into any field on the table that is not listed.
Some time passes, and now we come to the end of the customer lifecycle and our customer wishes to unsubscribe. Sigh—can’t win them all.
Our user clicks unsubscribe, and the following SQL runs:
DELETE FROM Users WHERE UserID=5;
The syntax is similar to a SELECT statement, however the SELECT * is replaced with DELETE. The statement says DELETE from table Users the record that matches UserID=5. The WHERE clause is very important here! If we didn’t specify which record to delete and instead ran this SQL statement,
DELETE FROM Users;
all records would have been deleted from the Users table, since we didn’t include a WHERE to limit which records are deleted!
And that’s how you add and remove a record from a table!
Explore on your own with an SQL Fiddle of today’s lesson! Since this is not a SELECT statement, your syntax must be written in the panel on the left-hand side.
Recommended book:
“SQL Pocket Guide” by Jonathan Gennick
Share with friends