The Exposure Triangle
Episode #2 of the course Introduction to photography by Robin Whalley
Yesterday, you learned about the camera and the Auto mode. Today, you will learn how to take back control and still produce good photos.
When you take a photo in Auto mode, the camera determines the combination of aperture, shutter speed, and ISO to use. The camera’s objective is to produce a well-exposed image and minimize any camera shake.
Understanding Exposure
When an image is correctly exposed, it appears to have good levels of brightness. When it’s overexposed, it appears too bright, and when it’s underexposed, it’s too dark.

Some cameras feature a histogram (a type of graph) that can help you determine if a photo is correctly exposed.
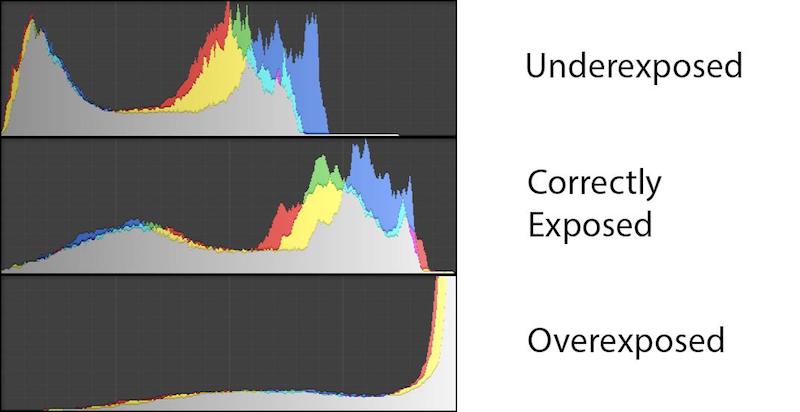
When a photo is correctly exposed, its histogram is usually spread across the entire chart. Under and overexposed images have a histogram that’s bunched at one end of the chart or the other.
Camera Creative Modes
Many cameras have special creative modes in addition to Auto, allowing you to control the camera settings. These modes are sometimes in the menu, but most often appear on a dial on the camera body.
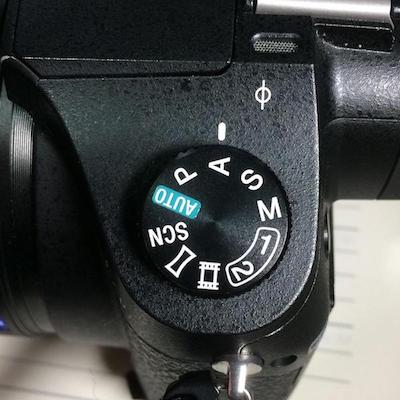
This dial is typical of most cameras and shows four creative control modes: P, A, S, and M.
P is Program mode. It’s like “Auto” and doesn’t provide much control.
A (Av, on some cameras) controls the aperture. The camera then determines the shutter speed to produce a well-exposed image based on the ISO setting. Use this mode to control depth of field—for example, shooting landscapes where every part of the image needs to appear in focus. Aperture settings are measured in “f-stops” and are written as f/2.0 and f/4.0. The larger the number, the smaller the aperture and the less light it allows through.
S (T or Tv, on some cameras) sets the shutter speed. The camera determines the aperture to produce a well-exposed image based on the ISO setting. Use this mode if you’re shooting fast-moving subjects and need to freeze the action. Shutter speeds are written in seconds or more usually, fractions of a second—for example, 1/30” and 1/60”.
M is the Manual mode. You control both the aperture and shutter speed to produce a correct exposure. Use this setting if you are shooting in a studio with lighting and need to take full control.
The Exposure Triangle
The combination of aperture, shutter speed, and ISO settings produce the photo exposure. Too little of any will cause underexposure, while too much will overexpose the image. These three settings are often referred to as the Exposure Triangle.
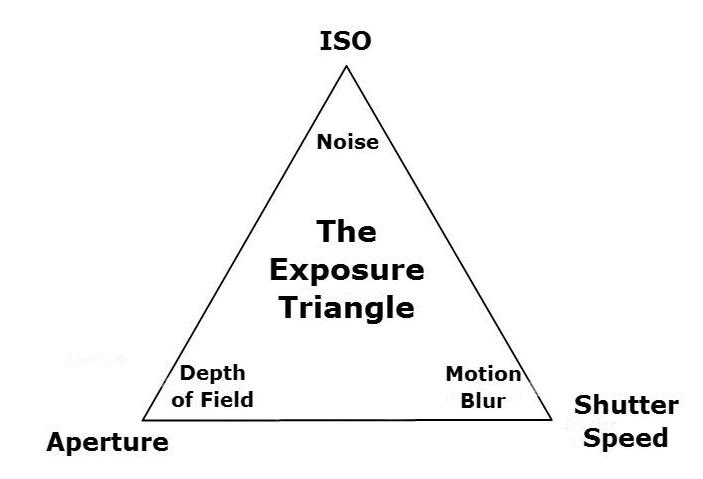
When we use the A mode to select the aperture, the camera determines the best shutter speed based on the ISO. When we use S to set the shutter speed, the camera selects the aperture based on the ISO. In both cases, the camera is trying to produce a correct exposure.
To determine the correct exposure, the camera measures the light reaching the sensor using a light meter. This is called reflected light, as it’s reflected by the subject being photographed.
In some situations, the camera’s light meter can be fooled. This can happen if a scene is very bright, such as a snow scene. Here, the camera can underexpose the image. Another situation occurs when a scene is dark, such as at night. Here, the camera tries to lighten the scene, causing it to be overexposed. Many cameras have a special dial or setting to compensate for such errors. It is called exposure compensation.
Tomorrow, you will learn about camera lenses and how you can use them to create better photos.
Learn Something New Every Day
Get smarter with 10-day courses delivered in easy-to-digest emails every morning. Join over 400,000 lifelong learners today!
Recommended reading
What Is Creative Camera Control?
Recommended video
Understanding Exposure with the Exposure Triangle
Share with friends