Exporting your Photos
Episode #10 of the course How to edit photos in Lightroom by Robin Whalley
In the first nine lessons of this course, we covered a lot of material about editing photos. But we haven’t explored how to export your finished photos, which is today’s lesson.
Why Export Photos
When you edit an image in Lightroom, you don’t make any changes to the image. What happens is you build up a history of changes and the image isn’t affected.
To create a photo that reflects your adjustments, you need to export the image from Lightroom. It’s only when you export the image that a new image is created with all the adjustments applied to it.
How to Export
You can export your finished image by right clicking on the image and selecting “Export | Export …” from the popup menu. You can also use “Export …” option from the “File” menu to display the Export dialog.
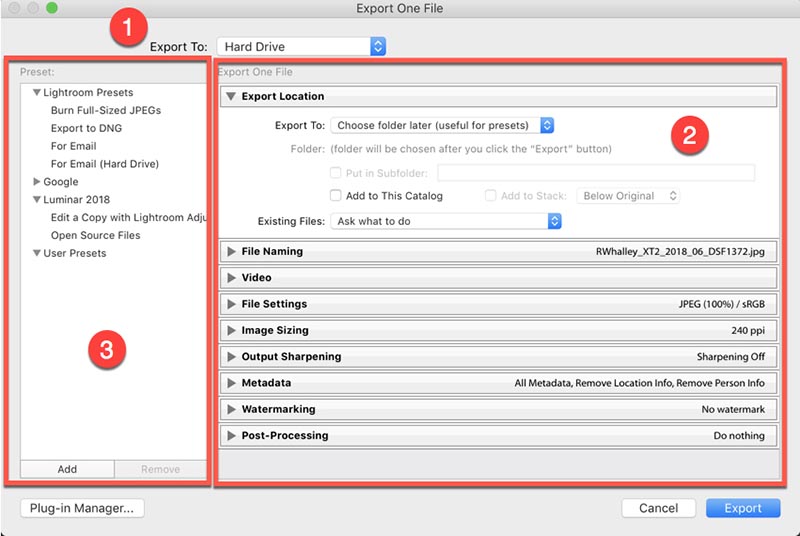
The Export dialog is all about controlling the type and size of photo you want to create with the export.
The drop-down at the top of the dialog (1) controls where to export the image. Here, it’s set to “Hard Drive,” but you can choose other options, like “Email.” The available options depend on your computer’s configuration and software.
Down the right side of the dialog (2) are settings to control the export. With these, you can control the type of image file, the size, if the image is sharpened, and more.
Configuring export settings can be time consuming and repetitive, so you can save the settings as a Preset (3). When you want to use these same settings again in the future, just select the Preset from the list.
Let’s examine some of the more important Export options.
Export Location
The options in this section allows you to choose where to export the image.
The main setting to choose is in the drop-down list at the top “Export To:”. There are a few options here, but possibly the most flexible is, “Choose folder later.” When you use this, you can repeat the export and choose a different location every time.
There’s also an option in this section to “Add to This Catalog.” Lightroom keeps track of all the images it produces in the Lightroom Catalog. This is really a big database. By ticking this option, all the new images you create are added to the Catalog database.
If you’re going to delete the image file later, don’t select this option, or Lightroom will think there is a missing file.
File Settings
Here, you can select the file type you want to generate.
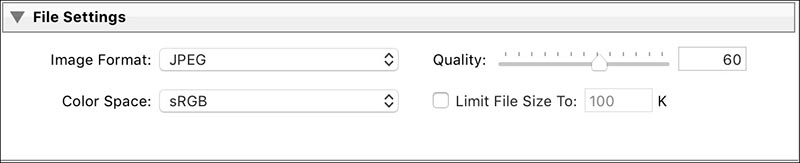
In this example ,we see the Image Format as JPEG, which is the type of image file to be created. The other options in this section will then change depending on your choice.
We also have control over the Color Space of the image file. This determines the range of colors that can be represented. The internet uses the sRGB Color Space, where print publishers might use Adobe RGB because it can represent more colors.
Image Sizing
This allows you to resize the image as it’s exported.

When you select “Resize to Fit:”, you can choose different sizing options from the list. In this example, the “Long Edge” of the image will be resized to 1,600 pixels.
Output Sharpening
If your exported image is being resized (smaller or larger), it’s a good idea to sharpen it. Also, if you’re exporting an image for printing, you will probably need to sharpen it.

You can sharpen the image to display on a “Screen” or making a print to either “Matte Paper” or “Glossy Paper.” Then you set the level of sharpening to be applied “Low,” “Medium,” or “High.” The level of sharpening depends on the amount of fine detail you want to emphasize. If there isn’t much select low or if there is a lot select high, a portrait would be best set to Low or Medium, whereas a Landscape with lots of fine detail is best sharpened as Medium or High. If you’re unsure, select Medium.
Based on your choices, Lightroom determines and applies the correct level of sharpening.
With all your settings selected in the dialog, click “Export” to produce your finished image.
I hope you have enjoyed and benefited from this course. We have covered a lot of material, but there’s much more you can still learn, and Lightroom changes regularly as new features are released.
Recommended book
If you would like to further develop your editing skills, please consider my book, The Photographers Guide to Lightroom’s Develop Module, available from the my website or Amazon.
Share with friends