
Data Types and Next Steps
Episode #10 of the course Relational database design by Ben Brumm
Welcome to lesson ten and the final lesson of this course!
In the last lesson, we learned about third normal form and transformed our database to meet the rules of third normal form.
This also means our database is normalized.
In this lesson, we’ll learn about adding data types to our fields and next steps.
Data Types
When we create a database, we create the tables and columns that we want to store information about. This comes from our database design work.
For each of the columns that we have, we need to specify what kind of data it needs to store. There are three main types of data that is available for a column:
• Number: Stores numbers only. Good for sorting, mathematics, and statistics.
• Text: Stores text (A-Z), numbers, and special characters. Good for a wide range of values, but can be harder to perform analysis on.
• Date: Stores dates and times. Good for measuring time since a certain date and for other date-related operations.
As part of our design, we should specify the data types for each of our columns.
This will help us to understand if we have the right database design and will help the development team who creates the database with setting it up.
Now, the specific data types to be used will depend on the database system that is being used (e.g., Oracle, SQL Server, MySQL, something else), so in our design, it’s a good idea to keep it at a high level.
There are some general principles when assigning data types to columns that we can follow here:
• ID values should be numbers
• Names should be text values
• Anything date-related should be a date
• If a value is most commonly a number value but could have text, make it a text data type
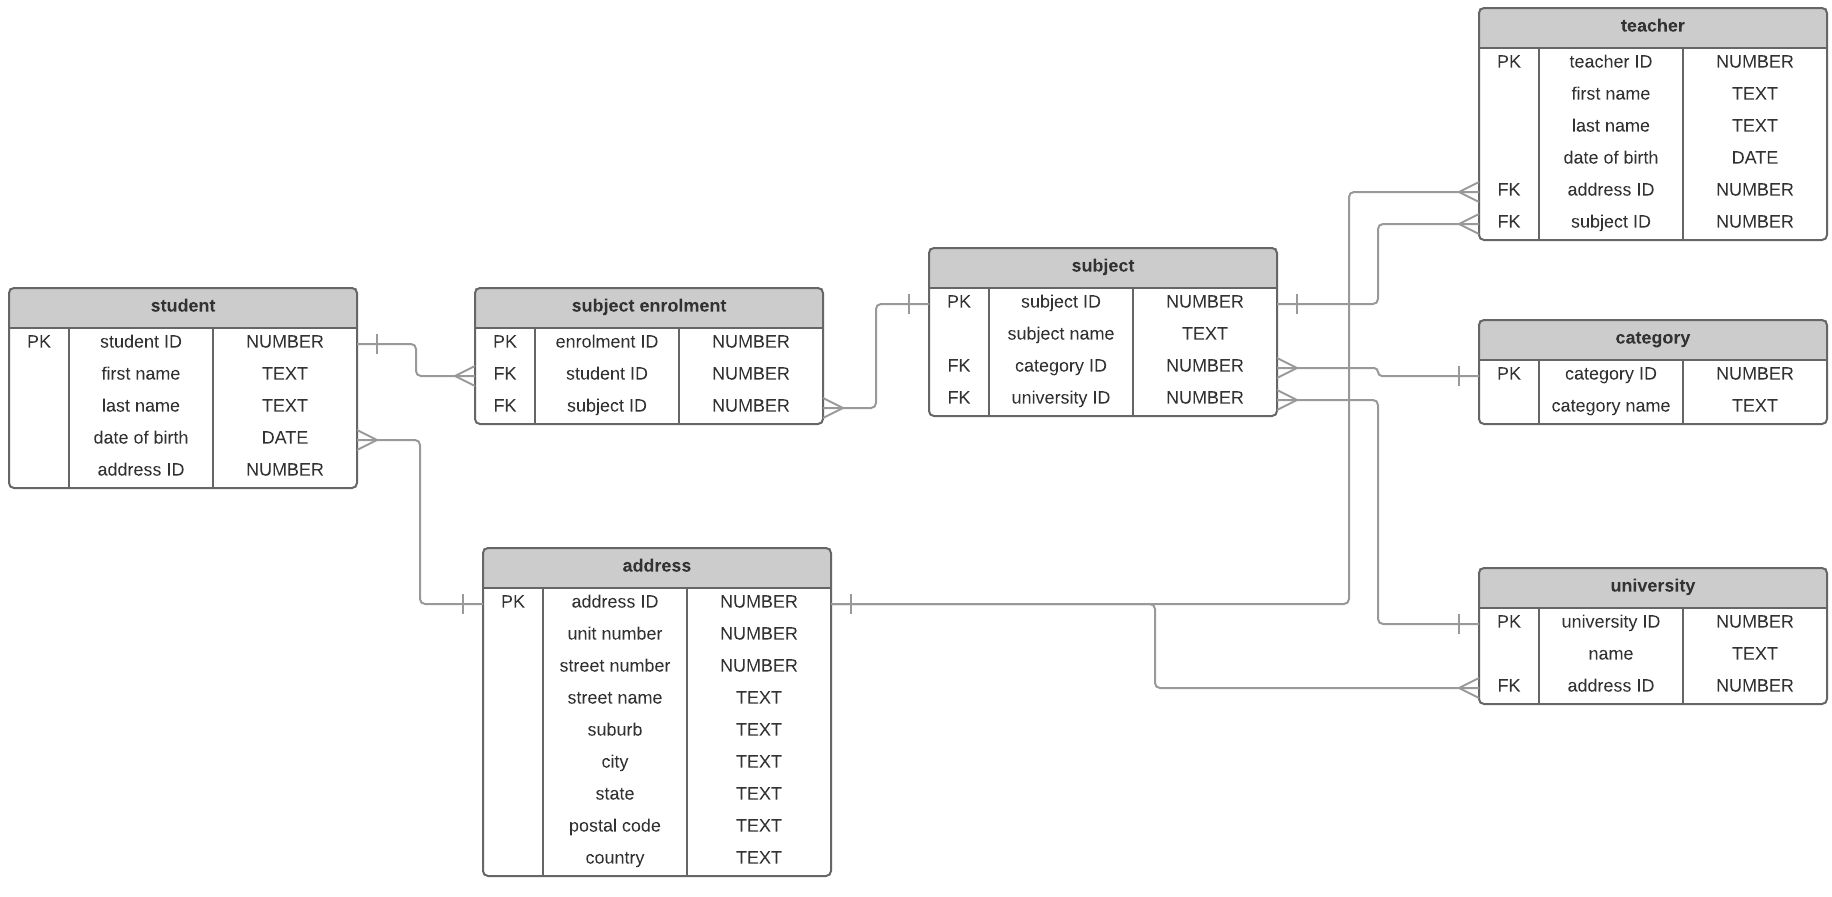
With our database, we can assign data types by adding the name of the data type next to each of the columns. In this example, I’ve added the word NUMBER, TEXT, or DATE.
Student (student ID (NUMBER), first name (TEXT), last name (TEXT), date of birth (DATE), address ID (NUMBER))
Address (address ID (NUMBER), unit number (NUMBER), street number (NUMBER), street name (TEXT), suburb (TEXT), city (TEXT), state (TEXT), postal code (TEXT), country (TEXT))
Subject Enrollment (enrollment ID (NUMBER), student ID (NUMBER), subject ID (NUMBER))
Subject (subject ID (NUMBER), subject name (TEXT) category ID (NUMBER), university ID (NUMBER))
Category (category ID (NUMBER), category name (TEXT))
Teacher (teacher ID (NUMBER), first name (TEXT), last name (TEXT), date of birth (DATE), address ID (NUMBER), subject ID (NUMBER))
University (university ID (NUMBER), name (TEXT), address ID (NUMBER))
We can also add these to our diagram by adding a label next to each column:
Great! Now we have our tables in third normal form along with their data type.
Your database design is now complete!
What’s Next?
Well, if you want to get this database created, you need to convert it to an SQL script. You can do this yourself, if you know how, or ask a developer in your team to do it for you.
This script will create the tables you need with all of the columns and relationships.
The database will then be ready for data to be added to it!
I hope you’ve enjoyed this course and learned how to design a relational database.
Thanks,
Ben, DatabaseStar.com
Subscribe to Ben’s free newsletter and get a copy of his Oracle SQL Functions Cheat Sheet, a 10-day email course to improve your SQL skills, and occasional articles with technical and career advice for database developers!
Recommended book
“Handbook of Relational Database Design” by Candace C. Fleming, Barbara von Halle
Share with friends