Controlling Focus
Episode #4 of the course Introduction to photography by Robin Whalley
Yesterday, you learned about the camera lens and how you to use it in your photos. Today, you will learn how to control lens focus.
Auto or Manual Focus
You have already learned that a lens can be manual or autofocus. When you use a manual focus lens, you must ensure the image is focused before you take the photo. With an autofocus lens, the camera will do this for you. But most autofocus lenses can be switched to manual.
If you are photographing a moving subject, such as a sports event, you will probably want to use an autofocus lens. Where the subject and camera are both fixed, such as a landscape scene, you may prefer to use manual focus.
When subjects are moving very fast—for example, a racing car on a track—it can often be better to use manual focus as well. By manually focusing on a point on the track, you can shoot the photos as the cars reach that point. This prevents any delay from the autofocus system that may blur the image. Some cameras have predictive autofocus for such situations, and you should check your camera manual.
Camera Focus Points
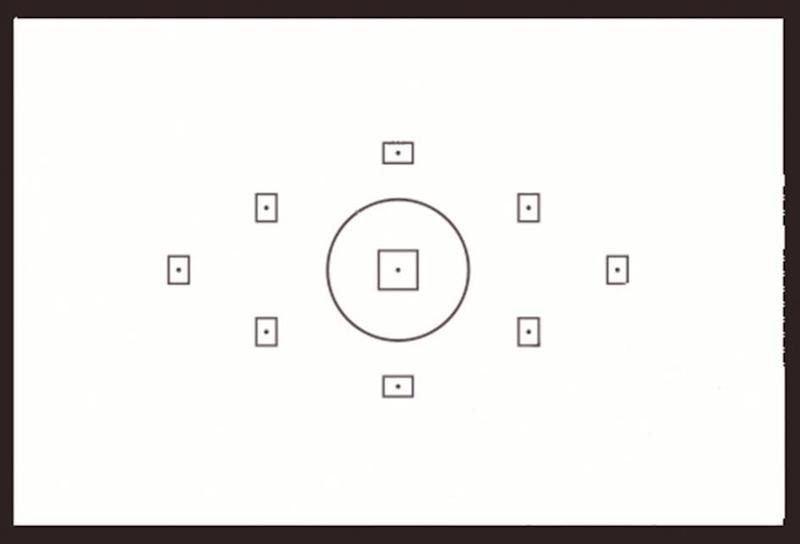
When using an autofocus lens, the camera has many focus points. These are usually displayed on the screen or in the viewfinder. How many points there are will depend on the make and model of the camera.

Here, we can see the focus points in a DSLR camera. Which focus point is used tends to be determined by the camera, but this is a bad idea. It’s important the correct focus point is chosen by you. Most cameras have a certain way to choose a focus point, and you should consult the manual.
In recent years, manufacturers have introduced features like face recognition to improve the selection of the focus point. This can be a helpful feature if your camera supports it, but you should still learn to select the focus point.
Why Choose a Focus Point?
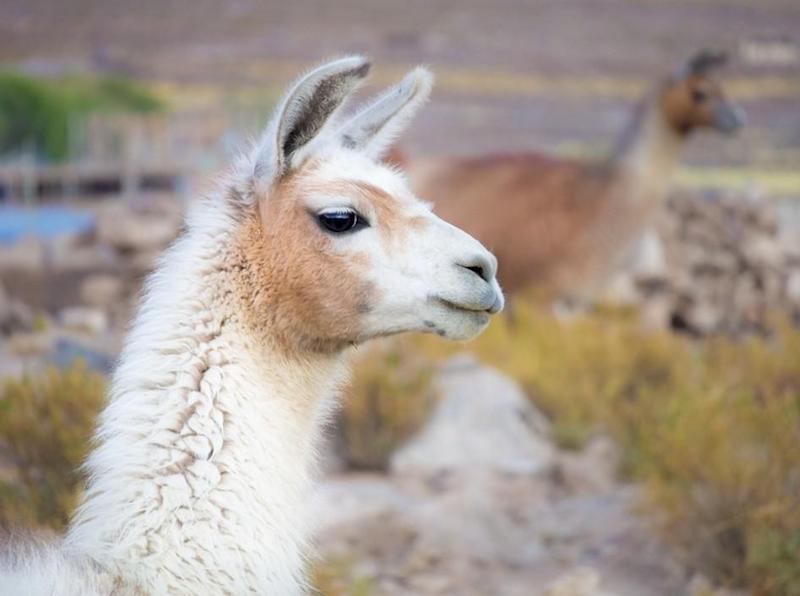
It’s important to select the best point of focus, to help direct the viewer’s attention in the photograph. Look at the following photo and count the llama.

Most people don’t notice the second llama in the background because it’s out of focus. By focusing on the eye of the first llama, the viewer’s attention is directed away from the background. You also probably didn’t notice the building work on the left, in the background.
Remember, when people look at your photos, they pay attention to what’s in focus and ignore blurred areas. You can control this with the point of focus.
Depth of Field
The other technique used in the photo above is a shallow depth of field. The depth of field is the area that appears in focus. We can control this with the aperture, as well as with the point of focus.
When you use a wide aperture (f-stop with a small number, like f/2.8), the depth of field is shallow. This means that objects farther in the distance appear out of focus. If a small aperture (large f-stop number, like f/18.0) is used, the background will appear in focus.
Depth of field, or the zone of focus, will extend twice as far behind the focus point as in front of it. Additionally, the nearer the point of focus is to the camera, the shallower the depth of field will appear. Good photographers learn to control this.
Tomorrow, you will learn about composition and how to improve yours.
Recommended reading
Read or reread your camera manual on how to control focus.
Share with friends
