
Advanced GTD Gmail Features
Episode #5 of the course Master your Gmail to get more done by Dan Silvestre
Welcome back!
We have set up our GTD Gmail Inbox and created a couple of labels and matching filters.
For the final step of our GTD Gmail, we’re going to cover features for advanced users, such as keyboard shortcuts (default or custom), auto-advance emails, send and archive, and undo send.
While you don’t need to set these up to use your GTD Gmail, they will help you optimize repetitive tasks and save a few clicks every time (which translates to a lot of clicks over time).
Keyboard Shortcuts: Default
If you are into productivity, you probably already use keyboard shortcuts in other applications, such as Excel or Chrome.
A couple of key commands can save you thousands of clicks over time, especially on tasks you do over and over again.
Go to Settings > General, find “Keyboard shortcuts” and toggle the button to on:

You have enabled the default shortcuts for Gmail. It’s time to learn them using this list of Keyboard shortcuts for Gmail.
For our GTD Gmail, the most important are:
• c for compose
• e for archive
• # for delete
• r for reply
• a for reply all
• s for star
• / for search
But if you prefer to set up your own custom keyboard shortcuts, we’ll need to enable another Gmail Lab.
Keyboard Shortcuts: Custom
Go to Settings > Labs, find “Custom keyboard shortcuts,” and toggle the button to enable:

This will create a new tab in Settings where you can customize your hotkeys. Navigate to Settings > Keyboard Shortcuts and modify the keys as you like.
Here’s a list to make it easy to remember the main actions of the GTD Gmail: compose, archive, delete, reply, reply all, star, and search.
Auto-Advance Emails
Go to Settings > Labs, find “Auto-advance,” and toggle the button to enable:
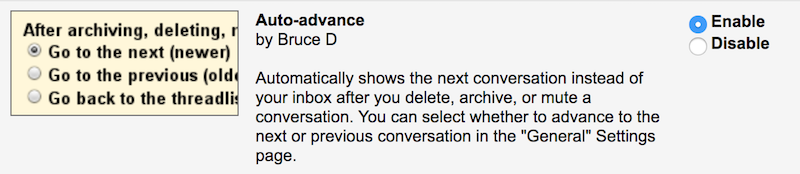
Now navigate to Settings > General, find “Auto-advance,” and choose the option, “Go to the next (newer) conversation”:

And it’s done! After archiving an email, it will automatically go to the next email, instead of the default way of going to the inbox.
You just saved yourself hours per week. Self-high-five!
Send and Archive
When you reply to an email, it stays in the inbox. What we want to do in our GTD Gmail Inbox is automatically archive a conversation after sending it. Luckily, this feature can be turned on with a few clicks.
Once again, go to Settings > General, find “Send and Archive,” and click “Show Send & Archive button in reply”:

Save your changes.
With this option on, you will have an additional button when replying to an email that is in your main inbox:

Hmm, that blue button wasn’t there before!
Use the new blue button by default, archiving all emails that you have replied to. You will get to Index Zero much faster.
But don’t forget to star the email if you want to move it to the right-inbox before sending it!
Undo Sending
Finally, we’re going to enable something on our GTD Gmail that should be a default feature: undo send.
Sometimes we press the send button way too fast, by mistake, or wonder if it was a great idea five seconds afterward (at which point, we frantically try to un-send it).
Step 1: Click Settings > General, find “Undo Send,” and choose ten seconds from the drop-down (or 30, if you mess up a lot):

Step 2: Save changes. This will reload your Gmail.
Step 3: Send an angry email to Google, listing 50 reasons why this should be by default.
Congratulations, you are now the proud owner of a GTD Gmail!
It’s time to get to Index Zero for the first time.
And that’s exactly what we will cover in tomorrow’s lesson.
To a Productive You!
Dan
Recommended book
The Checklist Manifesto: How to Get Things Right by Atul Gawande
Share with friends