Fill to the Edge
Episode #10 of the course Master photographic composition by Tom Ang
Hi!
Welcome to the final lesson on photo composition. I hope you’ve learned tips that will progress your photography.
Some ideas may seem awkward to do. At first, some may give uncertain results. But keep at them. Those that seem good to you, that make you feel better about your photography, are those worth developing. Whatever doesn’t feel right, just drop it. You may take it up later, or you may find ways to tweak it to suit you better.
Let’s end with a technique that can be tricky to master and can be time consuming. But when it works, it feels miraculous. And it’s quite unique to photography.
Stage Management
So far, our compositions have been fairly straightforward. They work with one main idea at a time. Now, we move up a class. We pull together several compositional ideas and cram them into the same image. Our aim is to fill the stage of the picture frame with lots of interesting characters. More than that, we want the sense that they are linked together in some way.
• We use the idea of working with strongly defined shapes (Lesson 2).
• We use the idea of significant items walking into a position that creates meaning or is visually appealing (see Lesson 3).
• We use the idea of lines crossing the picture to link elements together (Lesson 5).
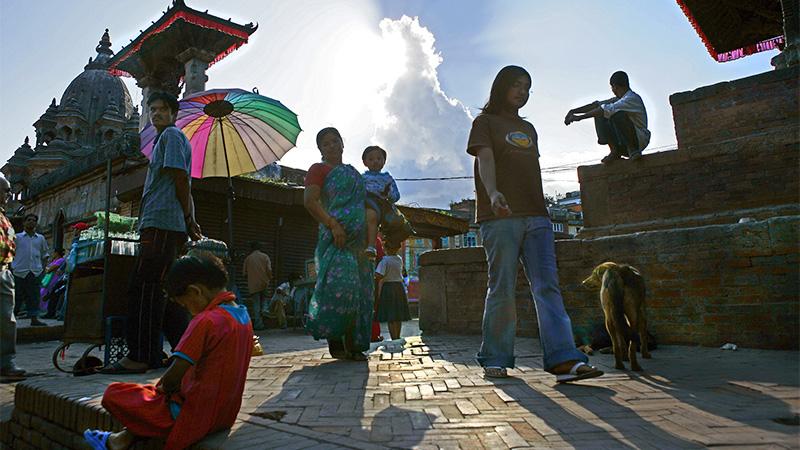
• Actually, we’re using all the techniques we’ve explored together. And we throw them all into the soup to see how it all comes out. What we aim for is to fill the image to each corner with activity, but in a way that looks organic and structured as such that every element is placed perfectly.

In the shot of umbrellas above, I planned the shot I wanted while waiting for the rain to stop. I pointed the camera upward from low down to catch the arches and the umbrellas from below. Then I fired off as people came in and out of view with their umbrellas. Try to work out how many different techniques are at work here.
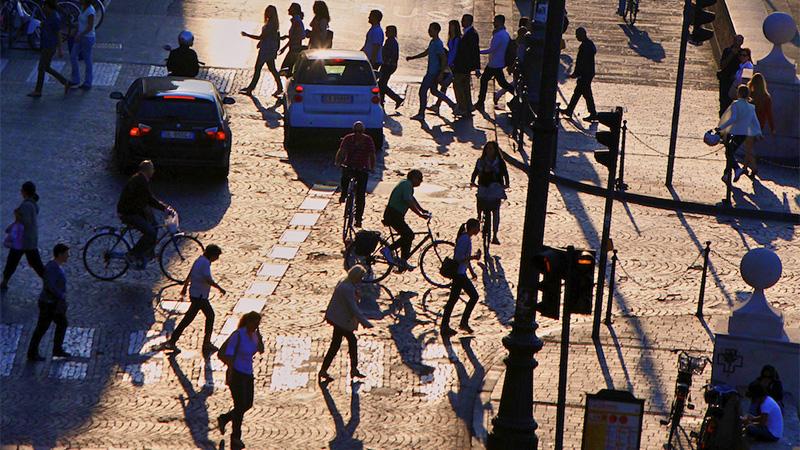
Shooting Style
Photographing a busy crossing in town can easily lead to a chaotic, messy image (see above). But with careful timing, as people space themselves out, every patch fills with vibrant life.
Try this:
• Watch and wait, firing off the shutter from time to time. It may help if you half-close your eyes, so you don’t see in detail but just get a feel for what’s going on.
• Review your images only when you get home; it’s not possible to be sure what you’re getting until you can look at images on a big screen. Besides, while you’re peering at the back of the camera, life is carrying on regardless!
• With SLR, cameras remember the fact that if you see it, you’ve missed it (the viewfinder blacks out at exactly the time of exposure). So, try to fire a little ahead of the action.
• Keep shooting until you get tired. Then keep your attention up: It’s often when you’ve given up that the perfect combination occurs. (That’s just how life is!) In the shot below, people were walking in and out of shot all the time. All I had to do was wait.
That wasn’t too hard, was it? The fact that you can add together different techniques shows that you’re already beginning to master each one.
I hope you’ve enjoyed this course. There was a lot to take in, so it’s worth reviewing earlier lessons.
But your best action is to leave your desk, grab your camera, and pop out to take some photographs.
May the light be with you!
Tom
Recommended resources
Raghu Rai: One of the greatest masters of street photography; his unerring eye for design in chaos comes from a deep meditative calm leading to awareness.
Raghubir Singh: Another peerless master of making compositions on the hoof.
Recommended book
100 Great Street Photographs by David Gibson
Share with friends